 |
||||||||
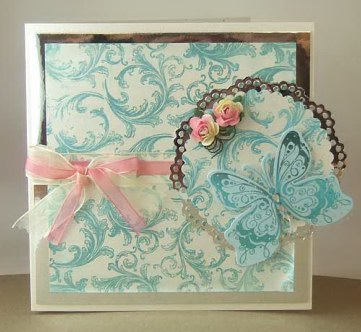
Card Making Project - Butterfly and Roses Card
Made by Madeleine
The background for this card is created by using rubber stamps and a metallic ink pad stamped onto Stardream paper. Because of the pearlescent finish to the Stardream paper you will need to leave the stamped paper overnight for the ink to dry.
|
||||||||
 |
To make this card you will need:
|
|||||||
Stamping the background onto the Stardream Quartz Paper
Cut the Stardream Quartz paper to 125mm x 125mm.
Adhere the embellishments stamp to the acrylic stamp block (these stamps are self cling) and ink up with the teal metallic ink. Starting at the bottom edge of the paper stamp the design.
Carefully turn the paper around (the ink will still be wet), ink the stamp again and stamp the image, again starting at the bottom edge of paper.
You will probably have a narrow gap between the stamped images at the top and bottom of the paper. This will be hidden by the ribbon.
Cut another piece of Stardream paper approx. 100mm x 100mm and ink up the stamp and stamp the image again. Put a spare piece of cheap copy paper underneath as the inked stamp will cover more than the paper being stamped.
Put both pieces of stamped Stardream Quartz paper to one side to dry overnight.
Mounting the Stardream Quartz Stamped Paper on to the Silver Mirror Card
Cut a piece of silver mirror card to 138mm x 138mm.
When dry, take the 125mm x 125mm stamped Stardream Quartz and glue it centrally on the silver mirror card using an extra strength glue stick.
Don't worry if the Stardream Quartz curls a bit when the glue stick is applied - it will straighten out once it's stuck to the mirror card.
Adding the Ivory and Rose Ribbon
Line up the Ivory and rose organdie ribbon and, using 6mm double sided tape, attach it to the middle of the Stardream Quartz and silver mirror card taking it well behind the mirror card.
You will find the narrow gap between the 2 stamped images on the Stardream Quartz stamped paper will act as a guide as to where to place the ribbon.
Glue on to the Stardream Quartz creased card using photo glue.
Creating the Mount for the Butterfly and Roses
Cut a piece of Silver mirror card to measure 100mm x 100mm. Run it through the die cutting machine using the largest Nellie's multiframe frame flower die.
Take the stamped Stardream Quartz paper measuring 100mm x 100mm and using the Nestabilities scallop circle that is just a bit smaller than the Nellie's flower die you used, run it through the die cutting machine.
Glue the Stardream Quartz scallop circle to the silver Nellie's flower mirror card using an extra strength glue stick.
Glue to the card so that it overlaps the right hand edge by approx. 15mm using photo glue.
Adding the Butterfly and Roses
Push out the die cut butterfly and corresponding acetate wings. Glue the acetate wing to the butterfly using a Quickie Glue Pen.
Add three teardrop gems to the body of the butterfly using Didi glue dots.
Using 3D foam pads mount the butterfly so the bottom of the wings slightly overlaps the die cut mount.
Using a pencil (Madeleine actually used the dowel of the bowmaker) twist the stems of each rose to create a spiral. Attach the roses to the mount using mini glue dots.
Creating the bow
Take 2 lengths of the ivory and rose organdie ribbon and either freehand, or using a bowmaker, tie into a bow. Attach to the card using Didi glue dots.
********************************
Please feel free to copy this card for your own use. Our angel policy can be accessed via the Gallery home page.
______________________________________________________________________________
|
||||||||
|
||||||||