 |
||||||||
Card Making Project - Cream and Gold Locket Card
Made by Mary
|
||||||||
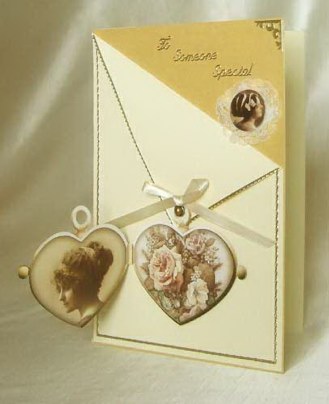 |
Combining different textures and finishes of card and the addition of lace gives this card a luxurious feel.
To make this card you will need:
|
|||||||
Glue the A5 Stardream Gold card to the front of the card using photo glue.
With a pencil lightly mark on the right hand edge of the cut cream hammer card the 120mm point measuring from the bottom of the card. Score from the top left hand corner to the marked 120mm point. This is easier with a Hougie board. Fold along the score to create a flap.
Using narrow border peel offs place around the edge of the cream card and the flap.
Push out the locket from the card toppers sheet. Using the gold gel pen add highlights to the lady's hairband. Fold the locket and close.
In the corner of the cream hammer card flap make a hole and push through a small gold pearl brad. Apply a little photo glue to the back of the locket then hook the locket over the brad and stick down.
Take a length of the cream 7mm satin ribbon and make a bow. Trim the tail, if necessary, and attach the bow to the card just above the brad using a didi glue dot..
Push out one of the small portrait card toppers. Take a small piece of lace and make a circle just bigger than the card topper then fix the lace in place on the card using 3D foam pads. Attach the card topper on top of the lace using memory glue dots.
Add the peel off sentiment to the gold card and a Fleur De Lys corner peel off.
(This Locket can be opened to reveal the portrait and the flowers.)
********************************
Please feel free to copy this card for your own use. Our angel policy can be accessed via the Gallery home page.
____________________________________________________________________________
|
||||||||
|
||||||||