 |
||||||||
Card Making Project - Marianne Rose Card
Made by Madeleine
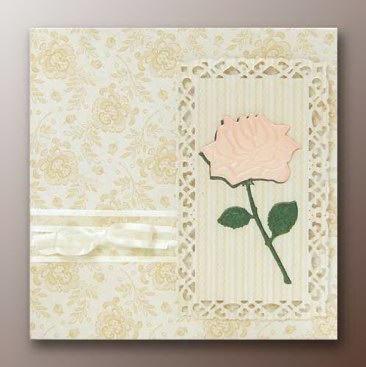
Create this simple card with your die cutting machine using pretty papers and ribbon. The Marianne Design Rose die is one of the most popular dies that Marianne has brought out for 2014 and here it is teamed with papers from the Oyster Blush Collection from Docrafts.
Using papers from the same pack ensures that the papers coordinate with one another and here we've used a floral paper for the background and a striped paper as the mount for the rose. The Oyster Blush papers have a lovely, subtle sheen to them so gilding wax is used on the embossed parts of the rose to give the rose an extra sheen too.
You need a die cutting machine to make this card.
|
||||||||
 |
To make this card you will need:
|
|||||||
Take a sheet of the paler floral background paper and trim it to 148 x 148mm. Take a sheet of the coordination striped paper and cut it to slightly larger than the second largest of the Romantic Rectangles Two die.
Cut two lengths of the white stain edge ribbon. Using double sided Fingerlift tape and, starting under where the mount with the rose will go, glue one length of the ribbon into place on the floral background paper taking the ribbon around the back of the back of the background paper on the left hand side to secure into position.
Leaving a gap of about 5mm glue the second piece of ribbon into place. Using photo glue attach the floral background paper to the front of the card and leave to dry.
Placing wax paper between the striped paper and the Romantic Rectangles Two die run it through the die cutting machine.
Usually at this point with Nestabilities dies you would change plates and run it through again to emboss but with patterned paper the embossing either isn't going to show or only show very faintly so there isn't any point to doing this.
Using first the Stardream Emerald card and then the Stardream Rose card run the Marianne Creatables Rose through the die cutting machine once to cut and then, changing plates, once again to emboss.
This is 4 runs through the die cutting machine - once to cut the emerald card, then to emboss the emerald card, then to cut the rose card and finally to emboss the rose card.
Do not use wax paper with the Marianne Rose die. The card both cuts easily and can be removed from the die easily. This is once case where the use of wax paper will be detrimental as it will cause the die cut to slip during the embossing process and the rose will not correctly emboss.
Using a pair of small scissors (decoupage scissors are ideal) cut off the stem and trim the bottom of the Stardream rose die cut rose slightly. Apply the pearl moon gilding wax to the embossed areas of the Stardream rose die cut rose.
The best way to apply gilding wax is with your finger (although in the interests of health and safety using a thin disposable rubber glove is advisable). Apply the wax lightly adding a second or third application until you get the desired effect.
Attach the Stardream rose die cut to the Stardream Emerald die cut using photo glue and placing the rose die cut ever so slightly to the right of the emerald one so that some of the green just shows through.
Using photo glue position the die cut rose on the striped Romantic Rectangles Two mount and leave to dry. Attach the mount to the right hand side of the card using 3D foam pads.
Take another length of the white satin edged ribbon and make a bow (Madeleine used a bowmaker). Attach the bow so that it slightly overlaps the upper and lower ribbons using mini glue dots.
********************************
Please feel free to copy this card for your own use. Our angel policy can be accessed via the Gallery home page..
______________________________________________________________________________
|
||||||||
|
||||||||