 |
||||||||
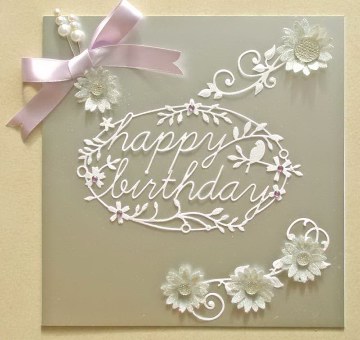
Silver Happy Birthday Card
Made by Madeleine
On this large 198 x 198mm (just a tad short of 8 x 8 inches) card Madeleine has used matt silver card as the background with white iridescent card for the for the die cut Happy Birthday and scrolls. The flowers, made using the Marianne Flora - Daisy die, are cut from silver vellum then their tips dipped in mother of pearl glitter. The lilac bow and beads add a touch of colour.
You need a die cutting machine to make this card.
The instructions for cutting the dies assume you are using a Big Shot or Cuttlebug - if you are using an Xcut Xpress or a Big Shot Plus you should be able to run all the dies through at the same time.
|
||||||||
|
To make this card you will need:
Creased Card
198mm x 198mm Card Blank
Card and Paper:
Dies
Embellishments
Glues
Tools
|
|||||||
Cut the matt silver card to 198 x 198 and glue to the creased card front using photo glue. Put to one side.
Creating the Die Cuts
Cut the iridescent glitter card to a size that will cover the Memory Box die and both the Anja's Vintage swirls and run through the die cutting machine once to cut.
Adhere the smaller of the Anja's Vintage scrolls to the top right and the larger one to the bottom right of the card. The large Happy Birthday Tidings die cut is placed in the centre of the card. As all these die cuts are intricate and going on to matt silver card - which will show any mark however careful one is - the die cuts were glued in place using glue dots. Mini and micro glue dots were placed on certain parts of the die cut, e.g. on the Happy Birthday die cut they were placed behind the flowers and bird, the top of each "h" and "p" and the bottom of each "y" and also on a few leaves.
When placing glue dots onto intricate die cuts do not, as usual, take the die cut to the glue dot but instead pick the glue dot up with a cocktail stick (or similar implement) and then drop it onto the back of the die cut in position.
You need to cut 8 of the smaller daisy and 2 of the larger daisy but, because 100gsm silver vellum is used to make the daisies, the dies will easily cut 2 or 3 layers at a time and, as the Daisy dies only cut and do not emboss you should be able to make all 8 quite quickly.
Using ultra thin glue dots glue two layers of each daisy together to give you one larger and 4 smaller flowers.
Put a little of the mother of pearl glitter powder into a dish. Brush a little Cosmic Shimmer Flake and Glitter glue highlighter to the tips of the daisies, dip the daises into the glitter, then shake off the excess.
Place a small circle dazzler in each of the 4 smaller flowers and a medium dazzler in the larger one. Leaving one of the smaller daisies to one side, place the larger daisy in the top right corner of the card and the 3 remaining smaller ones along the scroll at the bottom right of the card using ultra thin glue dots.
Adding the Pins and Bow
Using a length of the lilac ribbon make a bow. Place 2 white pearl pins at the top left corner of the card using Pinflair glue and then add the bow at an angle. Place the remaining flower under the centre of the bow.
********************************
Please feel free to copy this card for your own use. Our angel policy can be accessed via the Gallery home page.
______________________________________________________________________________
|
||||||||
|
||||||||