 |
||||||||
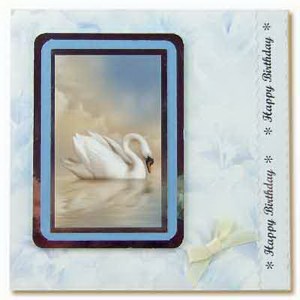
Card Making Project - Simple Topper Birthday Card
Made by Madeleine
This card is made using some pretty backing paper that coordinates with the card topper and so is suitable for a beginner. The fancy edge on the right hand side of the card is optional - instructions are given for both a fancy edge or plain edge
|
||||||||
 |
To make this card you will need:
|
|||||||
Making the Base Card without a decorative edge
Cut off a strip 15mm wide from the right hand side of the card using either straight or a rotary trimmer and straight blade.
Cut the harebells backing paper to 144 x 129mm and glue to the front of the card using photo glue and leave to dry.
Tip: when using a fine backing paper, such as Harebells, apply the photo glue in a thin layer to the card - don't apply it to the paper. This way there is less likelihood of the glue marks showing through.
Cut the double Happy Birthday from the birthday sentiments sheet trimming it to 144mm and glue to the inside edge of the card.
Making the Base Card with the decorative edge
Cut off a strip 15mm wide from the right hand side of the card using rotary trimmer and short wave blade or decorative edge scissors of your choice.
Tip: If you are a beginner and are using decorative edge scissors then choose the deckle edge ones as then you won't have the problem of lining up the pattern.
Cut the harebells backing paper to 144 x 150mm to allow for any line up of pattern. Cut a 15mm strip off the 144mm width using the blade or scissors.
Line up the pattern and glue to the front of the card using photo glue and leave to dry. Trim off the excess backing paper at the top and bottom of the card when dry.
Cut the double Happy Birthday from the birthday sentiments sheet using the same blade or scissors trimming it to 144mm long and glue to the inside edge of the card.
Mounting the Topper
Using the corner rounder, round each corner of the silver mirror card and each corner of the Stardream Vista card.
Using photo glue attach the Stardream Vista to the silver mirror card. Leave to dry.
Again using photo glue, attach the topper to the Stardream Vista card and leave to dry.
Attach the mounted topper to the card using 3D foam tape.
Finishing the card
Using a Didi glue dot attach the bow.
When making the insert allow for the side piece by cutting your insert smaller, i.e. the insert size will be 138mm x 244mm so it doesn't overlap the Happy Birthday side panel.
********************************
Please feel free to copy this card for your own use. Our angel policy can be accessed via the Gallery home page.
___________________________________________________________________________
|
||||||||
|
||||||||