 |
||||||||
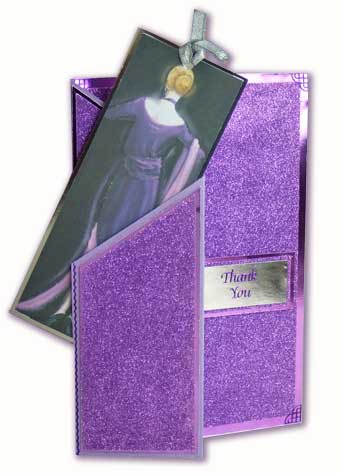
Card Making Project - Purple Glitter Bookmark Card
Made by Dianne
A very sparkly card to say "Thank You". The nicest thing about this card is that the bookmark can be used by the recipient when the card ceases to be displayed. Look for card toppers that are long and thin or create your own by stamping an image onto a long strip of white card and colouring the image.
|
||||||||
 |
To make this card you will need:
|
|||||||
Scoring and Creasing the Card
Take your Stardream card, score and crease in half to create an A5 card.
Measure half way on one side of the card, score and crease again.
If you have an EaziScore, these measurements were made at the A4 half and A4 gatefold lines.
Cutting the Card to create the Zig Zag
Measure approx 100mm down on the short side of the card on the piece that now has 2 panels on front, mark the 100mm with a pencil then, line this mark up with the centre crease. Draw a line between the 2 and then cut this corner off, this will give you a graduated edge to the front of your card. After cutting, fold back at the first crease to create a gatefold on the front of your card.
Adding the Foiled Card and Glitter Paper
Cut 2 pieces of purple foil card and, using double-sided tape, glue to the inside and outside of your gatefold panels as shown in the photo above, cutting the top edges to shape. Then do the same with the purple glitter paper, but make it a little smaller than the foil card to leave a small border. (You won't have to use a full lengths of card for the inside panel as this won't be seen later).
Cut a piece of purple foil card to line the inside back of your card and then measure a piece of glitter paper a little smaller than the foil card, again leave a small border of foil card when sticking the paper onto the card.
Creating the Pocket
Using the ultra high tack double sided tape, stick down the front panel down the side and bottom to create a pocket on the front of your card, make sure you stick along the very edge to make room for your bookmark to be inserted.
Adding the Peel Offs and Greeting
Colour in 4 corners, a border, and the Thank You peel offs with the purple permanent marker pen to match your papers.Place a corner peel off in each corner on the right hand side of the card and a border peel off down the left hand side of the pocket.
Cut a small piece of purple foil card approx 65mm x 35mm, and then a piece of glitter paper to 60mm x 30mm and, using double sided tape, glue the paper onto the card. Then cut a slightly smaller piece of silver foil card approx. 55mm x 25mm, and using the ultra high tack double sided tape, glue this on top of the purple glitter paper. Attach 3D foam pads, or silicon glue, on the bottom of your greetings panel and stick to right hand side of panel of the card as shown in the photo.
Making the Bookmark
Select the purple coloured topper and punch a hole through the top. Thread through a small length of lame ribbon, place your bookmark in the panel and voila, your card is complete!
********************************
Please feel free to copy this card for your own use. Our angel policy can be accessed via the Gallery home page.
____________________________________________________________________________
|
||||||||
|
||||||||