 |
||||||||
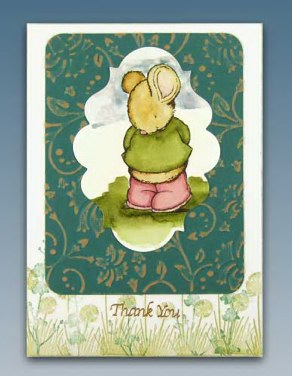
Card Making Project - Stamped and Embossed Thank You Card
Made by Jacqui
This sweet little mouse stamp from the Country Companions range makes a lovely Thank You card. It would also make a cute birthday card or, because the mouse is looking down, it would be ideal for a Belated Birthday card. The card is also another example of Jacqui's use of sanding Kraft Core Core-dinations cardstock on embossed card. A case of adding colour by taking it away.
You need a die cutting machine for this project.
|
||||||||
 |
To make this card you will need:
|
|||||||
Select the Shade 15 green card from the Kraft Core Core-dinations paper pad. Using the correct sandwich for your machine, run the green Kraft Core card in the embossing folder through the die cutting machine to emboss it. Sand back to reveal the core and show the detail of the embossed pattern (if using an emery board use the course grit side) and round the corners using a corner rounder punch.
Place the Country Companions Mouse stamp on an acrylic block and, using Stazon, stamp the image onto the natural white card. Leave to one side.
Take the flower silhouette stamps and create a border along the bottom of the card blank using first the Versacolour Evergreen ink with one of the stamps and then the Encore Metallic Honeydew ink with the other stamp.
Attach the embossed green Core Kraft card to the card blank with photo glue placing it near the top of the card blank - about 3mm from the top edge.
Using the distress pens colour the mouse stamped image, using the water brush to blend the colours, and leave to dry.
Once dry, select the Nestabilities Labels Twenty that just covers the stamped image. Place the die over the stamped image with the cutting edge of the die facing down on the natural white card (note that a little of the grass on the image will overlap the cutting edge of the die). Use low tack masking tape to hold the die in place so it doesn't move when you run it through the die cutting machine. Turn the card and die over so that the die is now facing upwards with the paper on top and run it through your die cutting machine.
Remove the masking tape and glue the die cut image onto the card using photo glue.
Add peel off sentiment.
********************************
Please feel free to copy this card for your own use. Our angel policy can be accessed via the Gallery home page.
______________________________________________________________________________
|
||||||||
|
||||||||