 |
||||||||
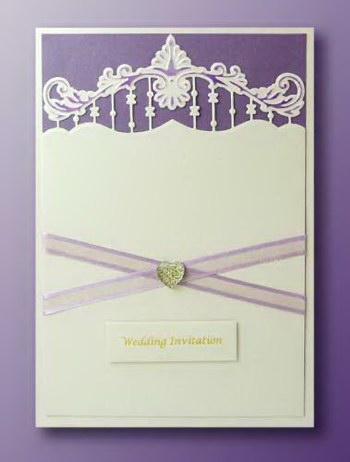
Card Making Project - Wedding Invitation Anja's Border 2
Made by Madeleine
Marianne Creatables Anja's border is perfect for wedding invitations. We've made two - for this one the border is at the top - for the other has the border on the side. Gold Wedding Words mounted onto the card gives this invitation a professional look - we used Dreamlight Crystal to make the wedding words so it matched perfectly with the die cut and the Stardream creased card. Madeleine teamed the Stardream Crystal with Stardream Amethyst but you can just adapt it to your own colour scheme.
When calculating the amount of card needed, Madeleine got the creased card out of one sheet of A4 Stardream Crystal (it is an A5 card) and could get two of the die cut card fronts out of the second sheet so 3 sheets would be needed for every 2 invitations. To keep costs down, Madeleine used Stardream Amethyst paper rather than card and two pieces of the backing for mounting the die cut can be made from one sheet of the Stardream Amethyst paper so calculate 1 sheet of A4 paper for every 2 invitations.
As you need to leave the card to dry between various stages it might be better to make 2 cards at the same time so you can be working on one card during the drying time of the other one.
You need a die cutting machine to make this card.
|
||||||||
 |
To make this card you will need:
|
|||||||
Take one of the A4 Stardream Crystal sheets and crease down the middle (this is the A4 half fold line on the EaziScore).
Cut a piece of Stardream Amethyst paper to 200 x 135mm and, from the second A4 sheet, a piece of Stardream Crystal card to 202 x 135mm.
The reason that the Stardream Amethyst, although the same measurement in width as the Stardream Crystal card, is 2mm less in height is because the piece of Stardream Crystal cared will lose 2mm when being die cut and the two pieces should be an exact fit..
Using a couple of small pieces of low tack masking tape at either end to hold the die in place, place the die on the piece of Stardream card so that the top point of the die is at the top edge of the card. Run it through the die cutting machine to cut. Carefully remove the masking tape but make sure the card does not move out of the die. Changing plates, run it through the die cutting machine again to emboss.
Lightly apply the Golden Lilac gilding wax to the embossed area at the top of the die cut only.
Tip: it is better to use a very light touch and add a second coat of gilding wax rather than achieve the shade you want by applying too much as you risk applying wax where you don't want it.
Using photo glue, position the die cut Stardream Crystal card onto the Stardream Amethyst paper and leave to dry.
Take two lengths of lilac satin edge organza ribbon each a bit longer than the width of the die cut card (about 180mm of ribbon should be enough for each piece) so there is enough to put each piece on at an angle and take the ribbon around the back at both sides. With a little bit of double sided tape attach each length of ribbon to the back at the right hand side with the ribbons about 20mm apart. Using double sided tape place the lower ribbon at an angle so that when it reaches the left hand side of the card it comes in line with the top ribbon on the right hand side. Repeat with the top right ribbon crossing it over so that when it reaches the left hand side it is in line with the bottom right ribbon Both pieces of ribbon should be taken to the back and secured in place with double sided tape.
Place a heart dazzler where the ribbons cross over each other.
In making this card Madeleine found that, although self adhesive, it was a bit of a struggle to get the pad from the acetate backing sheet so she simply took off the dazzler and fixed it in place with a couple of mini glue dots.
Cut out the wedding invitation sentiment from the Wedding Words sheet and, using 3D foam tape 1mm thick, fix it in place towards the bottom centre of the die cut.
All that's left to do now is to mount your work onto the creased card using photo glue. Leave to dry.
********************************
Please feel free to copy this card for your own use. Our angel policy can be accessed via the Gallery home page.
______________________________________________________________________________
|
||||||||
|
||||||||