 |
||||||||
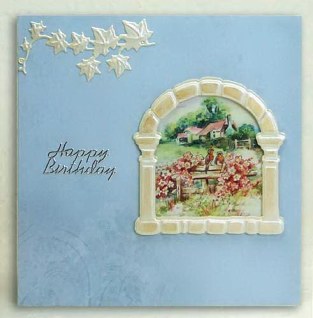
Card Making Project - Marianne Arch Card
Made by Madeleine
A pretty card made using the cottage and garden from the Marianne Tiny's Country Garden topper sheet and viewed through the Marianne Creatables arch which has been "aged" using gilding wax.
You need a die cutting machine to make this card.
|
||||||||
 |
To make this card you will need:

|
|||||||
Creating the Background
Take a sheet of the blue paper with the darker blue watermark design in the bottom left on blue from the Bellisima A5 paper pad. The paper is already 148mm wide so you just need to trim the length to 148mm. To retain the pretty watermark print trim the paper from the top. Attach to the front of the card using photo glue. Leave to dry (should only take a minute to dry).
Making the Die Cuts
Run some Stardream Opal card together with the Marianne Arch and Marianne Ivy Creatables through the die cuttin machine twice, the first ime to cut and then changing plates, or adjusting the dial (depending on which machine you are using) the second time to emboss.
Attach the ivy die cut to the top left of the card using photo glue.
Apply the Golden Light gilding wax to the embossed section of the arch in two or three light coats until the "aged stone" effect is achieved. Put to one side.
Using scissors cut out the card topper around the guide line on the sheet. Place the arch die so that the picture is centre in the middle and add some low tack masking tape to hold it in place (please note that even low tack masking tape is too tacky for gloss paper so get ride of some of the tackiness before using by dabbing the tape on the back of your hand).
Run the die and topper through the die cutting machine. Remove the masking tape and topper from the die and glue on to the card using photo glue. Leave for a minute or two to dry.
Finishing the Card
Attach the 3D foam pads to the arch die cut and line up carefully so it exactly surrounds the card topper on your card then stick into place.
Beginners tip: lining up die cuts by eye is something that comes with practice so you may want to practise with scraps of card first. If you still find you're not getting it spot on then, instead of die cutting the topper , place the arch into position and lightly draw around the arch shape. Using scissors you should cut inside of the pencil lines - this will give you more "room to play" when lining up the arch with the card topper.
Finally, add the silver peel off sentiment.
********************************
Please feel free to copy this card for your own use. Our angel policy can be accessed via the Gallery home page..
______________________________________________________________________________
|
||||||||
|
||||||||