 |
||||||||
Card Making Project - Racing Car and Gears Card
Made by Madeleine
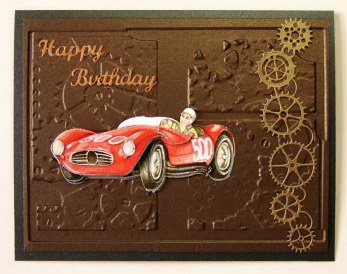
Embossing, die cutting, and decoupage are mixed together to create this birthday card suitable for men of all ages. The metallic colours of bronze, antique gold, and copper on an black pearlescent background add a subtle sheen to the card.
Copper paper is embossed to give thickness and texture to the Happy Birthday sentiment. Madeleine used the 3D embossing folder Basket weave with the copper paper but, as the actual pattern isn't visible (the greeting simply has a textured feel) then any embossing folder with an overall pattern to it could be used.
You need a die cutting machine to make this card.
|
||||||||
 |
To make this card you will need:
|
|||||||
Creating the Background
Trim the A4 sheet of Stardream Onyx card on the short end so it measures 297mm x 190mm and then crease down the middle (this is the A4 half fold line on the EaziScore) to create a card measuring 148mm x 190mm. The creased card for this design is a tent card so the creased edge is at the top of the card.
Cut a piece of Stardream Bronze card to 180mm x 138mm and run through the die cutting machine in the Creative Cogs embossing folder. Glue the bronze card centrally on the card using photo glue.
3D M-Bossabilities create a really deep embossed pattern but they are much thicker than standard embossing folders so you need to adjust your plate combination accordingly.
Cuttlebug
Plate A
Shim
3D M-Bossabilities Folder with Card Inside
Sizzix Texturz Rubber Mat
Plate B
Big Shot
Multipurpose Platform open
Sizzix Texturz Rubber Mat
3D M-Bossabilities Folder with Card or paper inside
Big Shot Cutting pad
Grand Calibur
Pink embossing plate
3D M-Bossabilities Folder with Card or paper inside
Raspberry plate
Xcut Xpress
Set the dial about 8.5 (Madeleine used the Xcut Xpress in making this card and the setting was just a tad under 8.5)
Making the Die Cuts
Using Stardream Antique Gold card and the Memory Box Gearworks Border die run it through you die cutting machine once to cut and then, changing plates, run through again to emboss.
Users of the Xcut Xpress should find that it both cuts and embosses on the first pass. Madeleine was amazed - hers didn't need to be run through again at all. This sometimes happens with the Xcut Xpress.
Attach the border to the right hand side of the card and using photo glue and leave to dry. Once dry rub off any excess glue with your thumb.
Run the piece of Stardream Copper paper through your die cutting machine using the embossing folder of your choice. Using the Elizabeth Crafts Happy Birthday die run it through your die cutting machine using the plate combination for thin dies. Attach to the top left of the card using photo glue.
Adding the Decoupage
Push out the decoupage pieces and build up the car using Pinflair glue. Leave to dry then attach the decoupage to the card using photo glue.
Pinflair glue dries much more quickly than other 3D glues - Madeleine's was dry within an hour.
********************************
Please feel free to copy this card for your own use. Our angel policy can be accessed via the Gallery home page.
______________________________________________________________________________
|
||||||||
|
||||||||
