 |
||||||||
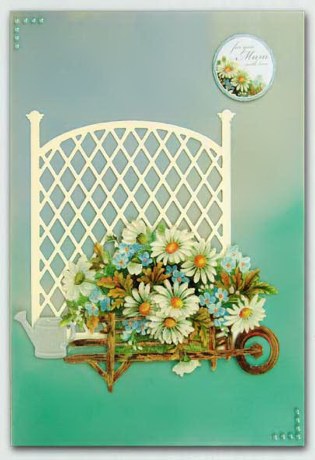
Card Making Project - Daisy Wheelbarrow
Made by Madeleine
This card uses a variety of techniques in its composition. First silver vellum is inked to create the background for the die cuts and decoupage. Silver vellum is the ideal material for inking as it is less porous than paper and yet still retains its lovely sheen through the ink.
The main focus of the card is the die cut decoupage against the backdrop of the die cut trellis. Only half of the decoupage layers were used so that their is less depth to the decoupage; this not only makes the card thinner for posting but also leaves enough of the decoupage pieces to make another card.
You need a die cutting machine to make this card.
|
||||||||
 |
To make this card you will need:
|
|||||||
Creating the Background
Cut the A4 sheet of silver vellum to A5 (148mm x 210mm).
Starting at the top of the sheet apply the sky blue ink directly from the inkpad using a circular motion. The aim is to colour the vellum sky blue to just below the half way mark at the left of the vellum but leaving about a 2 inch (50mm) gap at the right hand side. Apply the seashell ink in the same way to a thin diagonal strip in the centre and the top right of the vellum. Using the tropical green ink colour the rest of the vellum. At this point it will just look like blotches of colour in different sections.
Using the blending tool blend the edges where the different colours of inks meet using firm short stokes. Leave to dry for a few minutes.
Making the Die Cuts
Run a piece of the Stardream Opal card with the Trellis Panel die through the die cutting machine. This die is just a cutting die - it does not emboss. You may find that you need to give it a half turn and run it through the die cutting machine again to cut it successfully as it is quite an intricate die.
Using a small piece of Stardream silver card and the watering can die run it through the die cutting machine once to cut and then, changing plates (or adding the rubber mat and increasing the number of the dial for the Xpress), run it through again to emboss.
Building up the Decoupage
The pieces that Madeleine used in making this card were:
Push out the decoupage pieces and build up the car using Pinflair glue. Leave to dry (Pinflair glue is quite quick drying - the decoupage was ready to go onto the card in about half an hour.)
Putting the Card Together
Place a strip of high tack double sided tape down the creased edge and the right outer edge of the card then carefully, working from the creased edge adhere and smooth down the vellum.
Using photo glue put the trellis panel into position and then add the watering can to the bottom left of the trellis.
Using Pinflair glue sparingly (the aim here is for adhesion rather than height) glue the decoupage in place so that it overlaps the bottom of the trellis panel.
Push out the small round sentiment (Madeleine chose the "for you Mum with love" one) and glue into position using Pinflair glue giving the sentiment a little 3D height.
Add 7 mint 3mm pearls to the top left hand corner and 7 blue 3mm pearls to the bottom right corner.
********************************
Please feel free to copy this card for your own use. Our angel policy can be accessed via the Gallery home page.
______________________________________________________________________________
|
||||||||
|
||||||||
