 |
||||||||
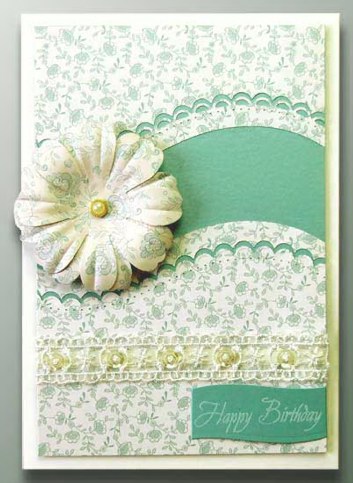
Card Making Project - Eau de Nil Curves
Made by Madeleine
The great thing about the Docrafts Capsule Collections is that the different elements within the collection match each other. For this card Madeleine used the Eau de Nil paper pad and Big Bloomers teaming them with Stardream Lagoon card. You really need to use one of the papers with a small pattern for this card as a larger pattern would be lost and look a bit odd once the paper is cut.
The sentiment is a rubber stamp. Again by using a stamp you can match it in to your colour theme - we have Versa Colour ink cubes in over 50 different colours! New to stamping? All it takes is some spare card and a bit of practice and once you have a stamp you can use it over and over again.
You need a die cutting machine to make this card.
|
||||||||
 |
To make this card you will need:

|
|||||||
Creating the Background
The background with it's curved pattern paper is a big feature on this card.
First cut the Stardream Lagoon card to 135mm x 195mm. Take the small floral design sheet from the paper pad and trim it down one side so that it measures 135mm wide.
Gather together the 3 dies - plain edge, scallop edge, and fancy scallop edge - from the Curved Border set. Place the plain edge die towards the upper middle of the patterned paper. Approximately 12 - 15mm above this die place the fancy scallop die. Approximately 12 - 15mm below the plain edge die place the scallop edge die. Making sure that all 3 dies are the same distance apart fix in place with some low tack masking tape.
Tip: Even with low tack masking tape you need to remove excess tackiness by running it over the back of your hand to prevent it sticking to the paper.
Run it through the die cutting machine just once to cut. Remove the masking tape.
Using photo glue and stating at the top position first the upper piece of die cut paper on the lagoon card. Leaving a slight gap of about 2mm, place the fancy scallop strip. Leave to dry before placing the bottom piece on the lagoon card and finally, leaving a 2mm gap the final strip of paper. Leave to dry.
Stamping and Cutting the Sentiment
Mount the stamp onto an acrylic block of a suitable size. For greater control when stamping the block should be the smallest that will comfortably take the size of stamp.
Ink the stamp with the white Versa Colour ink cube and stamp onto a spare pied of the lagoon card. Sprinkle with clear embossing powder, shake off the excess onto a space piece of paper and return the excess powder to the tub. Concentrate the heat gun on the stamped sentiment until the embossing powder melts.
Using the plain edge die run the stamped lagoon card through the die cutting machine with the edge quite close to the bottom of the stamped sentiment holding the die in place with a little low tack masking tape. Remove the masking tape and run the lagoon card and die through again but this time with the die close to the upper edge of the sentiment. If necessary trim both sides of the lagoon card at the sides. Put to one side.
Adding the Embellishments
Using Pinflair glue or 3D foam pads attach the stamped sentiment to the bottom right of the pattern covered lagoon card. The sentiment is flush with right hand side of the card and just slightly above the bottom.
Cut a length of the Marianne lace to approximately 155mm. Using double sided tape fix in place above the sentiment taking the lace around to the back of the lagoon card at both sides. Tape the ends of the lace with double sided tape at the back of the card.
Take 2 of the Big Bloomers of the same design and, twisting them slightly so the petals of the lower one appears peeping through the petals of the upper one, fasten together with a pearl brad. Fix the flower in place at the left hand side of the card on the lagoon card "gap" so that the petals slightly overlap the left hand edge of the lagoon card. Madeleine used Pinflair glue to fix the flower in place as it has a strong bond when dry.
Finishing the Card
All that's left to do now is to mount your work onto the card blank using 3D foam pads on Pinflair glue leaving an even border all around. Leave to dry.
********************************
Please feel free to copy this card for your own use. Our angel policy can be accessed via the Gallery home page. .
______________________________________________________________________________
|
||||||||
|
||||||||