 |
||||||||
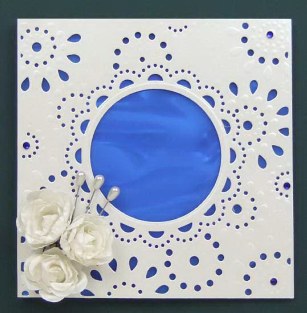
Card Making Project - Aurora Illusion Card
Made by Madeleine
Beautiful deep blue illusion film is the centrepiece of this card using the Aurora Create a Card die. Little is needed by way of embellishment - a few flowers at the bottom left and some pearl headed pins add interest to the design.
Illusion film has the appearance of shot silk and when teamed with pearlescent card just oozes luxury.
Please note: The illusion film for this card was cut on the Carl RT-200 rotary trimmer but, as illusion film is thicker than card, an entry level paper trimmer will struggle with the thickness it so you may need to use a craft knife, cutting mat and steel edge ruler.
You need a die cutting machine to make this card.
|
||||||||
 |
To make this card you will need:

|
|||||||
Creating the Blue and White Card Front
Cut the sheet of illusion film to measure 148mm x 148mm. Cut the Stardream Quartz card to 148mm x 148mm.
Using the Aurora die from the Card Creator range by Die'sire and the Stardream Quartz card run the die once through the die cutting machine to cut and then, changing plates (or increasing the number on the dial if using the Xpress) and using the embossing mat, run the card through the die cutting machine again to emboss. Put the centrepiece aside to use for another project.
Using Pinflair glue sparingly, (the aim here is to adhere the Stardream card rather than give it dimension) glue the back of the Stardream card avoiding the die cut pattern but paying extra attention to the sides and corners. Leave to dry.
Once the Stardream card is well and truly stuck fast to the illusion film apply Pinflair glue to the back of the illusion film. again avoiding the areas that show through the die cut front but this time use a little more glue so that it creates a 3D raised effect when placed on the front of the card blank. Leave to dry.
For quickness, if you don't want to wait again for the Pinflair glue to dry you can use 3D foam pads in place of the glue for adhering the illusion film to the card blank - just be careful when placing the pads that they do not show through the die cut areas of the card front.
Adding the Embellishments
Using Pinflair glue, attach 3 of the coconut Kaisercraft blooms to the bottom left hand corner of the card. Again the purpose is not to raise them for a 3D effect but to create a strong bond so smooth the layer of glue as you apply it. Leave to dry.
Add 4 deep blue 4mm gems to the centre of raised embossed area - you'll find the small embossed ones at either side of the card front and the large embossed ones at the right hand top and bottom corners.
Push 3 of the pearl headed pins, at an equal distance apart, well into the Kaisercraft blooms so that there is very little movement of the pins when in place.
********************************
Please feel free to copy this card for your own use. Our angel policy can be accessed via the Gallery home page. .
______________________________________________________________________________
|
||||||||
|
||||||||