 |
||||||||
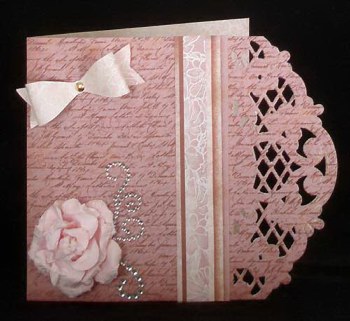
Card Making Project - Shades of Pink
Made by Madeleine
A great paper pack is not only full of beautiful papers - it is full of beautiful papers that work together. The Antique Library paper pack is just such a paper pack and is the basis of this card that features the Marianne Creatables Anja's Decoration die to give a lovely, intricate edge to the card. Very little else is needed by way of embellishment to complete the card: a pink bloom that coordinates with the papers from the paper pack, some gems, and a Marianne Design die cut bow.
You need a die cutting machine to make this card.
|
||||||||
|
To make this card you will need:
Card and Paper:
Dies
Embellishments
Glues
Tools
|
|||||||
Cut the white card to measure 122mm x 297mm and crease it down the centre to make a 122mm x 148mm creased card.
Take a sheet of the dark pink script pattern paper from the Antique library paper pack and cut it to 122mm x .148. Glue it to the front of the card using photo glue. Leave to dry.
Open out the creased card and fix the Anja's Vintage Decoration die in place with the centre of the die close to the edge. Hold in place with a little masking tape. Run through the die cutting machine using the mats for cutting thin dies.
Note: in making this card, because of the thickness of the card and paper together, Madeleine found she had to run it through her die cutting machine 3 times to obtain the perfect cut. The die wasn't run through a further time using the embossing plates as the embossing wouldn't have shown up on the patterned paper.
Take a sheet of the border strip paper from the Antique Library paper pack and cut the border making it 122mm in length. Glue in place using photo glue.
Select one of the sheets of paper that matches the floral pattern of the central panel in the border strip and cut it to 147mm x 122mm. Glue on the inside right of the card.
Beginners tip: when gluing a paper to the inside of a card the paper needs to be a millimetre shorter than one you would glue to the outside of the card. This is so that the paper can be placed up against, but not covering, the crease. If it covered the crease the card would be difficult to close.
Using the piece of floral paper left over and the tails and solid bow dies only, run through the die cutting machine using the cutting plates. Hold the pieces of the bow together with a small gold brad. Fix to the top left of the card, placing the bow at an angle, using a little Pinflair glue.
Take the large pale pink bloom in the Fairy Floss pack and fix in place using Pinflair glue.
Carefully peel off the smaller of the two self adhesive corner gem swirls from the backing sheet and snip off each of the side trails placing them to the right of the pink Fairy Floss flower. This will leave you with the large central swirl: put this back on the corner gems sheet for use in a future project.
********************************
Please feel free to copy this card for your own use. Our angel policy can be accessed via the Gallery home page..
______________________________________________________________________________
|
||||||||
|
||||||||