 |
||||||||
Card Making Project - Seasonal Bouquet
Made by Irene
This is one of those cards that looks as if there is a lot of work to making it but it is deceptively simple. The card is already die cut and precreased so you just need to fold it along the score lines and the Christmas bouquet is a die cut card topper from Docrafts that is just pushed out then glued on. Coordinating side panels are made from the same die cut set of toppers as are the corners on the front of the card. So just a bit of die cutting, lining up and gluing and your card is made.
Irene ran the Stardream Mars for the side panels through the Xcut Xpress using the A4 embossing folder Dainty Dots but if your die cutting machine isn't A4, e.g. you have the Cuttlebug or Big Shot, the just leave the backing mats for the side panels smooth.
You need a die cutting machine to make this card.
|
||||||||
 |
To make this card you will need:
|
|||||||
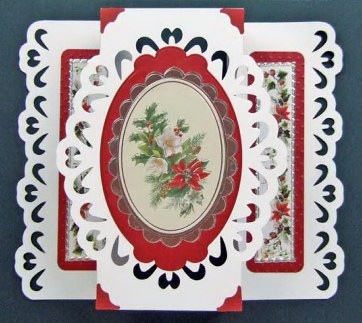
The Front of the Card
Take one of the large lacy cards, push out the die cut side panels and fold along the precreased lines.
Cut a piece of Stardream Mars card a little bigger than the Nestabilities Labels Ten die and run the card and die through the die cutting machine once to cut it. Using photo glue, adhere the Mars diecut to the central panel of the card.
Push out the oval bouquet and frame from the Seasonal Bouquet topper sheet and separate the silver frame from the centre card topper. Using photo glue, and the silver foil frame. glue onto the Mars die cut leaving an even border all around.
Take the bouquet centrepiece and using either Pinflair glue or 3D foam pads place the topper in the centre of the frame. If you have used Pinflair glue you will need to leave it to dry.
The benefit of using Pinflair Glue for 3D work is that it is easier to slide the topper into the centre as it is repositionable. The downside is that the glue takes quite a while to dry (about an hour.
Push out the 4 corners from the topper sheet and adhere to each corner of the central panel of the card using photo glue.
The Side Panels of the Card
Cut two pieces of Mars card measuring 40mm x150mm. Use the regular corner rounder punch on each of the 4 corners of both pieces of card.
If you have an A4 die cutting machine then run the two pieces of Stardream Mars card and the Dainty Dots embossing folder (using the side with the single dots) through the die cutting machine. using the dots embossing folder. If not, then miss out this step and proceed straight to the next one.
Using photo glue, glue the Stardream Mars rectangles onto the 2 side panels of the card.
Push out the piece of patterned border from the topper sheet and cut it in half to give 2 pieces each measuring 142mm long. Glue each one centrally on the Stardream Mars mounts using photo glue leaving an even border around each one.
Place glitter rope border peel offs around each of the topper panels.
********************************
Please feel free to copy this card for your own use. Our angel policy can be accessed via the Gallery home page.
______________________________________________________________________________
|
||||||||
|
||||||||