 |
||||||||
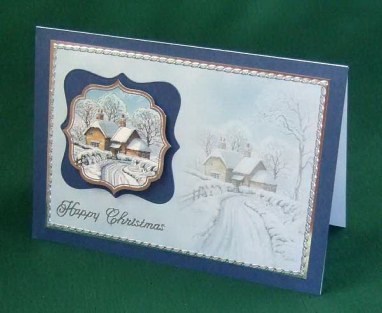
Card Making Project - Snowy Village Christmas Card
Made by Irene
This is an economical card to make because the coordinating backing paper, which gives the card a professional look, is actually included with the card toppers so for 99p you will get the card topper to make this card, the backing paper and still have plenty left over to make at least another 3 cards. Simply add a card blank, peel offs (you probably have these in your stash) and a sheet of Stardream card and mirror card for matting and layering.
Although you need a die cutting machine to make the card shown in the photo, if you don't have a die cutting machine you can still make this card by making a square card mount with the Stardream Sapphire card for the card topper. Below you'll find instructions for making the card both ways - with or without a die cutting machine.
|
||||||||
 |
To make this card you will need:
|
|||||||
Creating the Background
This card is made as a tent card with the fold along the top.
Cut a piece of the Stardream Sapphire paper to measure A5 (148mm x 210mm). Using double sided tape or photo glue adhere the A5 Stardream Sapphire card to the front of your card blank. If using photo glue, then leave for a minute for the photo glue to dry.
Cut a piece of silver mirror card measuring 130mm x 190mm and using photo glue or double sided adhesive tape glue centrally to the front of the card leaving an even order all round.
Cut a piece of the backing paper included in the topper set to measure 125mm x 185mm, ensuring that the picture of the house is on the right hand side. Stick this on top of the mirror card using double sided tape or photo glue, leaving a narrow border all round. Add the silver glitter rope borders to the edges.
Whether you use double sided tape or photo glue is up to you. Double sided tape is more economical than photo glue - a 50mm roll will last for ages - but photo glue is repositionable giving you time to ensure you papers are straight. If using photo glue take care not to use too much when gluing paper as this can leave patches on the paper (this problem doesn't occur when gluing card as card is thicker). Photo glue also has to be left to dry but drying will only take about a minute.
Creating the Mount for the Topper Using a Die Cutting Machine
Using the second largest die from the Labels 1 set and the piece of Stardream Sapphire card run through the die cutting machine.
Creating the Mount for the Topper Using a Die Cutting Machine
Cut the piece of Stardream Sapphire card to 85mm x 85mm and round each of the corners with the corner rounder punch.
Finishing the Card
Attach the mount to the left hand side of the card using photo glue leaving more room at the bottom than at the top to allow for the peel off sentiment.
Push out the card topper from the sheet and attach to the centre of the mount using Pinflair glue or 3D foam pads. If you've used Pinflair glue leave to dry.
Attach the Happy Christmas silver peel off sentiment in the bottom right hand corner below the topper.
********************************
Please feel free to copy this card for your own use. Our angel policy can be accessed via the Gallery home page.
______________________________________________________________________________
|
||||||||
|
||||||||