 |
||||||||
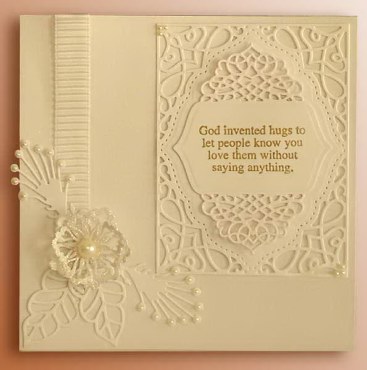
Hugs Stamped Card
Made by Madeleine
Madeleine had gone for a white theme for this card - the only colour being the stamp sentiment in gold. To get the shade of gold she wanted Madeleine mixed 2 different colours of embossing powder - detail gold and crystal. The use of the crystal embossing powder also adds a slight sparkle to the embossed wording. The little pots that come with the Storage Box with 12 Pots are ideal for mixing embossing powders - and storing them once mixed - just remember to label the pot before putting it back in the case.
This card has two segments to it: the stamped and die cut segment using the Tranquil Moments Card Creator die set and the embellished corner using the Marianne Design dies.
You need a die cutting machine to make this card.
|
||||||||
|
To make this card you will need:
Creased Card
173mm x 173mm Creased Card Blank
Card and Paper:
Dies
Embellishments
Stamps
Glues
Tools
|
|||||||
Creating the Stamped and Die Cut Topper
Using a small container mix half a teaspoon of detail gold embossing powder and half a teaspoon of crystal embossing powder and mix well. Stamp the sentiment onto a piece of smooth bright white card. Spoon over the embossing powder, shake off the excess, and heat with the heat tool. Leave to cool.
Cut as piece of Stardream Crystal card to 173mm x 173mm. Using double sided tape, attach a length of the white pleated ribbon about 20mm in from the creased edge of the card and starting about 40mm from the bottom edge. Using photo glue attach the Stardream crystal card to the card front.
Using the smooth bright white card, run through the largest and second largest dies through the die cutting machine - once to cut and then again, changing plate, to emboss. Using the second largest die and the stamped card run it through the die cutting machine once to cut and then again to emboss ensuring that the stamped wording is in the centre of the die.
Glue the 2 smaller die cuts together with the stamped die cut on top using photo glue, then glue onto the larger die cut and adhere the whole layers to the upper right of the card.
Adding the Corner Die Cut Embellishments
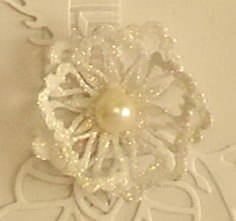 Using smooth bright white card run the flower from the Anja's Square set and both of the leaves through the die cutting machine to cut. Remove the card from the dies and using another piece of smooth bright white run the dies through again so you have 2 of each leaf and 2 flowers.
Note: there is no point in running the flowers through the die cutting machine a second time to emboss them as the embossing wouldn't show once the glitter is applied.
Apply the cosmic shimmer flake and glitter glue to the 2 flowers. Shake over the mother of pearl Sparkelicious glitter and shake off the excess. Put to one side.
Using photo glue, attach the 2 open leaves, pointing downwards, to the bottom of the ribbon overlapping them slightly. Attach 3mm pearls to the end of each of the fronds on the other 2 leaves and glue into position.
Curve the petals of the flowers upwards using your finger and then, giving them a slight twist, glue one to the other using a small amount of Pinflair glue. Glue the flower to the centre of the leaves using Pinflair glue and put a 10mm self adhesive pearl in the centre of the flower.
Attach 3 of the 3mm gems to the top left and bottom right of the large Tranquil Moments die cut.
********************************
Please feel free to copy this card for your own use. Our angel policy can be accessed via the Gallery home page.
______________________________________________________________________________
|
||||||||
|
||||||||