 |
||||||||
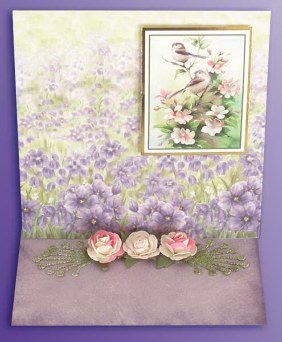
Floral Easel Card
Made by Madeleine
This card is quite quick and simple to make and uses as its main feature pretty papers from the Bluebell paper and a little card topper.
The easel is made by joining 2 148mm x 148mm cards together and the "stop" for the easel is some pretty roses in coordinating colours to those in the card topper.
You need a die cutting machine to make this card.
|
||||||||
|
To make this card you will need:
Creased Card
2 148mm x 148mm Creased Card Blanks
Card and Paper:
Dies
Embellishments
Embossing Powder
Glues
Tools
|
|||||||
Using the smooth bright white card and the leaf die run through the die cutting machine to cut, remove card and then run through again with a second piece of card so that you have two leaves. Apply Cosmic Shimmer flake and glitter flue to each of the leaves and cover with sensational sage embossing powder shaking off the excess. Heat with the heat tool until the embossing powder is set. Put to one side.
Using photo glue attach the back of one of the 148 x 148mm cards to the inside front of the other one. This will give you one card with 3 sections. Lie the card so that the 3 sections run from top to bottom and with the inside of the card uppermost on your work bench.
Take a sheet of the floral paper and a sheet of the lavender paper from the Bluebell paper pack and trim both papers to measure 148 x 148. Using photo glue, glue the plain paper to the bottom section of the triple card making sure that the paper lies just inside the crease and does not overlap it. Fold over the top flap and glue the floral paper in place.
Push out the bird and blossom card topper from the sheet. Using 3D foam tape attach the card topper to the top right of the card. Open the card up again.
Just over half way down on the bottom flap attach both of the leaves, with the fronds pointing slightly downwards at the outer edges of the leaves, using photo glue.
Attach the middle rose first onto the leaves using Pinflair glue and then each of the two roses to the side.
Pull the top flap forward to adjust the balance and then place behind the roses to form the easel.
********************************
Please feel free to copy this card for your own use. Our angel policy can be accessed via the Gallery home page.
______________________________________________________________________________
|
||||||||
|
||||||||