 |
||||||||
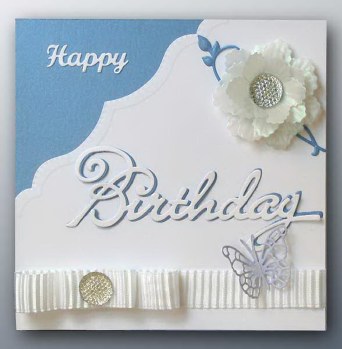
Happy Birthday Flower Card
Made by Madeleine
There's no doubting the occasion this card is made for with the large Birthday sentiment die cut from the Marianne Collectables Birthday die and stamp set. The eye-catching flower is made of iridescent vellum layered to create a stunning bloom - you'll find making flowers to embellish your card is easy with the Marianne Creatables Flower Fantasy die set.
You need a die cutting machine to make this card.
The instructions for cutting the dies assume you are using a Big Shot or Cuttlebug - if you are using an Xcut Xpress or a Big Shot Plus you should be able to run multiple dies through at the same time.
|
||||||||
|
To make this card you will need:
Creased Card
148mm x 148mm Square Card Blank
Card and Paper:
Dies
Embellishments
Glues
|
|||||||
Making the Background
With this card all the component parts are put together to create the card first and then added to the card blank at the end rather than being built up on the card blank piece by piece.
Cut a piece of Stardream Vista card to 148mm x 148mm and a piece of smooth bright white card to 148mm x 148mm.
Using the narrow Anja's border die across the corner of the smooth bright white card run it through the die cutting machine once to cut and then again, changing plates, to emboss. Using photo glue, adhere to the square piece of Stardream Vista card so that the cut corner is at the top left of the card.
Creating the Happy Birthday Die Cuts
Using a piece of the left over smooth white card together with the Happy die from the Happy Birthday die set and the large Birthday die from the Marianne Collectables Birthday die and stamp set run through the die cutting machine once to cut. Using a piece of the left over Stardream Vista card run the large birthday die through again.
Attach to the Happy die cut to the top left corner and the vista birthday die cut to just below the centre of the card. Position the white birthday die cut just a fraction to the left of the vista one to create a drop shadow.
When gluing intricate die cuts such as wording it's easy to get more glue on you than the die cut. Here's a couple of tips:
1. Put a little of the glue onto a spare piece of acetate. (Madeleine used photo glue because of its repositionable qualities). Put the die cut on the glue and lift off letting any drips of glue fall back onto the acetate.
2. Put a little of the glue in an egg cup and apply the glue to the die cut using a stencil brush.
Attaching the Ribbon and Creating the Faux Bow
Take a length of white pleated ribbon about 40cm long or approximately two and three-quarters times the width of the card.
Place a couple of Ultra Thin glue dots on the back of the card (about 15mm in from the edge) at each side and attach the ribbon. Take the ribbon around the front of the card holding it in position with ultra thin glue dots so that the ribbon meets about 40mm in from the left hand edge leaving a loop of ribbon left over. Fold the loop back on itself 2 times to create the bow (the bottom part of the bow on the card measures about 80mm and the top one 30mm) holding the two folded pieces of ribbon in place with ultra thin glue dots.
Attach a medium dazzler to the centre of the faux bow using an ultra thin glue dot.
Creating the Flower and Butterfly Die Cuts
Using a piece of the leftover Stardream Vista card and the smaller of the two Anja's Vintage Swirls die run through the die cutting machine once to cut and then again, changing plates, to emboss.
Adhere the swirl to the top right of the card across the corner.
Take the Marianne Creatables Flower Fantasy die set and cut 2 pieces of iridescent vellum slightly larger than the larger flower and 2 pieces slightly larger than the smaller flower. Run both pieces of each size of vellum together with the corresponding die through the die cutting machine once to cut and then, changing plates, again to emboss.
Vellum is such a fine material that two thickness can be cut and embossed together without any loss to the detail of the embossing.
Build up the flower giving a slight twist to each layer and attaching each one to the one below using ultra thin glue dots. Place a medium dazzler in the centre of the flower and put to one side.
Using the Memory Box Pippi Butterfly die and the lavender paper cut out 2 butterflies and 1 body. Glue the die cut butterflies together so that the lavender paper appears at both the front and back of the butterfly. Put to one side.
Putting the card together
Attach either 3D foam pads or dots of Pinflair glue to the back of the Stardream Vista card and place on the card blank.
Attach the flower to the upper right hand corner of the card and the butterfly under the letter y using a little Pinflair glue. Leave for the glue to dry.
********************************
Please feel free to copy this card for your own use. Our angel policy can be accessed via the Gallery home page.
______________________________________________________________________________
|
||||||||
|
||||||||